

Maintaining Your Home’s Central Air Conditioner
Introduction to A/C Components
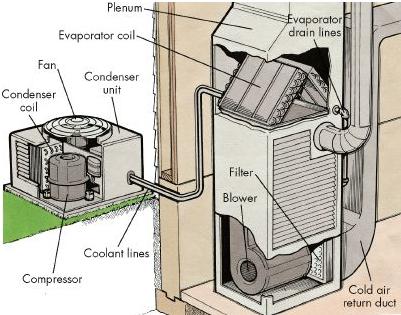
Central air conditioners have two separate main components: Condenser (left side of above image) and Evaporator (right side)
The condenser unit is usually located outside the house on a concrete slab or other sturdy mount to keep it from shifting out of level.
The evaporator coil is mounted in the plenum or main duct junction above the furnace (inside the house).
Most central air conditioners are connected to a home's forced-air distribution system. Thus, the same motor, blower, and ductwork used for heating are used to distribute cool air from the air conditioning system. When a central air conditioner is operating, hot air inside the house flows to the furnace through the return-air duct. The hot air is moved by the blower across the cooled evaporator coil in the plenum and is then delivered through ducts to cool the house.
Both the evaporator and the condenser are sealed. Therefore, a professional service person should be called for almost any maintenance other than routine cleaning. Central air conditioners should be professionally inspected and adjusted before the beginning of every cooling season. However, don't let your maintenance end with this annual checkup.
While there aren't many repairs you can make yourself, below you will find some specific maintenance procedures you can follow to keep your system operating at peak efficiency.
Caution: Before doing any work on an air conditioning system, make sure the power to the system, both to the condenser and to the evaporator assembly, is turned off.
Cleaning the Evaporator
The evaporator for the central air system is located directly above the furnace in the plenum. The evaporator may not be accessible, but if it is, you should clean it once a year. If the plenum has foil-wrapped insulation at its front, you can clean the evaporator; if the plenum is a sealed sheet metal box, do not attempt to open it. Here's how to clean an accessible evaporator:
Step 1: Remove foil-wrapped insulation at front of plenum; it's probably taped in place. Remove tape carefully, because you'll have to replace it later. Behind insulation is access plate, which is held in place by several screws. Remove screws and lift off plate.
Step 2: Clean entire underside of evaporator unit with stiff brush. A large hand mirror can help you see what you're doing. If you can't reach all the way back to clean entire area, slide evaporator out a little. Evaporator can be slid out even if it has rigid pipes connected to it, but be careful not to bend pipes.
Step 3: Clean tray below evaporator unit. Pour 1 tablespoon of household bleach into the weep hole in the tray to prevent fungus growth. In extremely humid weather, check condensate drain and pan every other day. If there's much moisture in pan, the weep hole from pan to drain line may be clogged. Open weep hole with piece of wire.
Step 4: Put unit back into place, reinstall plate, and tape insulation back over it.
Step 5: Turn back on air conditioner, and check to make sure you’ve sealed everything tight.
Maintaining the Condenser
Since the condenser unit is located outside the house, it will likely accumulate dirt and debris from trees, lawn mowing, and airborne dust. The condenser has a fan that moves air across the condenser coil. You must clean the coil on the intake side, so, before you turn off the power to the air conditioner, check to see which direction the air moves across the coils. Here's how to clean the condenser:
Step 1: Cut down any grass, weeds, or vines that have grown around condenser unit that could be obstructing airflow.
Step 2: Clean condenser with commercial coil cleaner, available at refrigerator supply stores. Instructions for use are included. Flush coil clean (do not use hose) and then let dry.
Step 3: Clean fins with soft brush to remove accumulated dirt. You may have to remove protective grille to reach them. Do not clean fins with garden hose, as water could turn dirt into mud and compact it between fins. Clean fins very carefully: They're made of light-gauge aluminum and are easily damaged. If fins are bent, straighten them with fin comb, sold at most appliance parts stores. A fin comb is designed to slide into spaces between fins. Use it carefully to avoid damaging fins.
Step 4: Check mounting pad on which condenser rests to make sure it's level. Set carpenters' level front to back and side to side on top of unit. If pad has settled, lift pad with pry bar or piece of 2-by-4, then force gravel or rocks under concrete to level it.
During the fall and winter, outside condenser units should be protected from the elements to prevent leaf blockage and ice damage. Cover the condenser unit with a commercial condenser cover made to fit the shape of the unit or use heavy plastic sheeting secured with sturdy cord.
Refrigerant Lines
The coolant used in most air conditioning systems is a refrigerant called Freon. If the system does not contain the proper amount of Freon, little or no cooling will take place. If you suspect a Freon problem, call a professional service person to recharge the system.
Caution: Do not try to charge your system's refrigerant lines.
Here's what you can do for the system's coolant lines: Examine the lines running from the condenser outside to the evaporator inside the house. If the insulation is damaged or worn, it will cut down on the cooling efficiency of the unit and, therefore, should be replaced with new insulation of the same type as soon as possible. Follow manufacturer's instructions for installation.
Drain Ports
As the air conditioner operates, condensed moisture and water vapor from the evaporator coil are funneled through drain ports or an opening between the partition in the middle of the evaporator coil and the condenser coil. At this point, the fan blows the moisture against the condenser coil, where the water is dissipated.
Drain ports can become clogged with dirt. The result is water leaking from the appliance, usually through the bottom of the grille. To prevent clogging, clean the ports with a short piece of wire hanger or the blade of a pocketknife. Do this at the beginning of every cooling season and every month during the season. Also check the condenser side of the air conditioner. Some models have a drain port along the bottom edge of the cabinet frame. If your air conditioner has this drain port, clean it out when you clean the other ports.
Fan
When a fan malfunctions, the problem is usually loose or dirty blades. If the fan won't operate or if it's noisy, cleaning and tightening will usually fix it. Here are the typical steps:
Step 1: Open cabinet and locate fan.
Step 2: Clean away any debris with vacuum and soft cloth.
Step 3: Check the fan blade on the motor shaft for looseness. The blade will be fastened to shaft with setscrew at hub of blade. Tighten the setscrew with screwdriver or Allen wrench. If air conditioner has round vent fan, you will have to tighten the fan on the motor shaft by inserting long-blade screwdriver through a port in the fan.
Step 4: If the fan has oil ports, apply 5-10 drops of 20-weight non-detergent motor oil (not all-purpose oil) to each port at beginning of cooling season.
There you have it, following these procedures as directed will greatly increase the chances that your air conditioner will operate at maximum efficiency and reach its maximum lifetime.
